Thank you all for reporting broken links.
Just checked every tut and fixed all the links that where kaput.
Only got so far as to chance mypsptubes to PTE for Garv and Elias.
Any other artist I used, I still need to check where they moved to, so I can link to that site, that is a ron job (ron slang for later on lol).
Please drop me a line with any broken links in case I missed some.
Thank you all
Hana.

Thursday 28 April 2011
Woohoo I managed to get a little bit of Mojo.
A new tut hopefully its not to bad.
INNOCENT

You can find it Here
A new tut hopefully its not to bad.
INNOCENT
You can find it Here
Monday 25 April 2011


Halloween Tutorial
ELIAS WITCH
Star Size is a little hard to see its 2.16
Select web 2 and hit random seed and same for web 3.
Duplicate your background layer 2 times so u have 3.
Close top 2 web and top 2 background layers,
on bottom background layer merge visible
close it, open next background and web and repeat above and again for next.
We should now have 3 layers,have the top layer selected for the next section.
Copy and paste as new layers all our supplied graphics.
The word art and your tube of choice, resize if needed.
Add drop shadow 1-1-50-5-black to all our graphics and tube.
Arrange the graphics and tube till your happy with how it looks.
Close all your background layers and tube layer. Merge visible all our graphics, and duplicate 2 times for 3. Close top 2 graphics layers, open bottom background and merge visible close it,
repeat for next 2 backgrounds and graphics layers.
We should have 3 layers and our tube layer, close all.
Open your tube layer and duplicate twice for 3 tube layers, name them tube 1-2-3
Close tube 1 and 3 and make sure tube 2 is highlighted.
Using your freehand selection tool, hold down the shift key,
and select sections of her hair and her clothing.

Click ok and select tube 3 and apply again changing the amplitude to 6 click ok.
Selections select none close all layers except tube 2.
Make sure tube 2 is highlighted,
and again with out freehand tool we select part of her boobs.
Go effects double click punch and do the following setting.
Close all layers, open tube 1 and open bottom background, select that and merge visible
close it and open tube 2 and background 2 repeat above steps and same again for tube 3.
Apply your copywrite , watermark and name to those 3 layers.
Copy bottom one to animation shop and paste as new animation.
Copy second one to animation shop, right click on frame and paste after current frame,
Copy last one and right click last frame and again paste after current frame.
Edit select all, then animation frame properties and change it to 20, click ok.
View animation and if happy with your result save it as gif.
Hope you Enjoyed this tut, Hana.
ELIAS WITCH
This tutorial was written by Hana on March 8th 2009.
Any creation you make from my ideas are yours.
You may print out this tutorial for your own personal use,
Please do not copy it in any way to put online,
pass out or rewrite without my permission
Or attempt to claim as your own.
Any creation you make from my ideas are yours.
You may print out this tutorial for your own personal use,
Please do not copy it in any way to put online,
pass out or rewrite without my permission
Or attempt to claim as your own.
Thank you Sharon for this wonderfull tube.
This tutorial is written for those with a working knowledge of PSP.
Supplies Needed:
I am using PSP 7 but any version will do.
Animation Shop
Alien Skin Xenofex2 Constellation.
Tube of choice. I am using the artwork of Elias Chatzoudis.
You have to purchase a license to use his work Here
Font of choice I used Poltergeist Thick
My Supplies Here
Open up a new transparent image 500 x 500 pixels and flood fill with #F4E2F3
or the colour of your choice and name it background.
Make a new raster Layer and floodfill #D3A0D2 or the colour of your choice.
Open up your mask in psp and minimize it.
Go masks - new - from image
Locate WebMask from drop down menu and select it.
The only thing ticked is source luminance, then click ok rename it mask.
Open clouds copy paste as new layer above background and under the mask layer.
Merge visible those 3 layers and rename background.
Copy and paste the large web and move it up slighty.
Duplicate it 2 times so u have 3 of them.
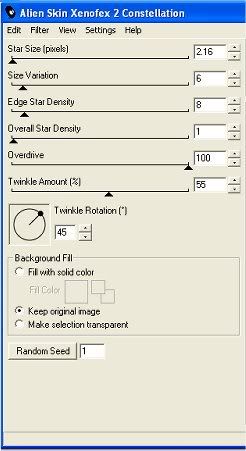
Highlight the first one and apply Alien Skin Xenofex2 Constellation
With the following settings
This tutorial is written for those with a working knowledge of PSP.
Supplies Needed:
I am using PSP 7 but any version will do.
Animation Shop
Alien Skin Xenofex2 Constellation.
Tube of choice. I am using the artwork of Elias Chatzoudis.
You have to purchase a license to use his work Here
Font of choice I used Poltergeist Thick
My Supplies Here
Open up a new transparent image 500 x 500 pixels and flood fill with #F4E2F3
or the colour of your choice and name it background.
Make a new raster Layer and floodfill #D3A0D2 or the colour of your choice.
Open up your mask in psp and minimize it.
Go masks - new - from image
Locate WebMask from drop down menu and select it.
The only thing ticked is source luminance, then click ok rename it mask.
Open clouds copy paste as new layer above background and under the mask layer.
Merge visible those 3 layers and rename background.
Copy and paste the large web and move it up slighty.
Duplicate it 2 times so u have 3 of them.
Highlight the first one and apply Alien Skin Xenofex2 Constellation
With the following settings
Star Size is a little hard to see its 2.16
Select web 2 and hit random seed and same for web 3.
Duplicate your background layer 2 times so u have 3.
Close top 2 web and top 2 background layers,
on bottom background layer merge visible
close it, open next background and web and repeat above and again for next.
We should now have 3 layers,have the top layer selected for the next section.
Copy and paste as new layers all our supplied graphics.
The word art and your tube of choice, resize if needed.
Add drop shadow 1-1-50-5-black to all our graphics and tube.
Arrange the graphics and tube till your happy with how it looks.
Close all your background layers and tube layer. Merge visible all our graphics, and duplicate 2 times for 3. Close top 2 graphics layers, open bottom background and merge visible close it,
repeat for next 2 backgrounds and graphics layers.
We should have 3 layers and our tube layer, close all.
Open your tube layer and duplicate twice for 3 tube layers, name them tube 1-2-3
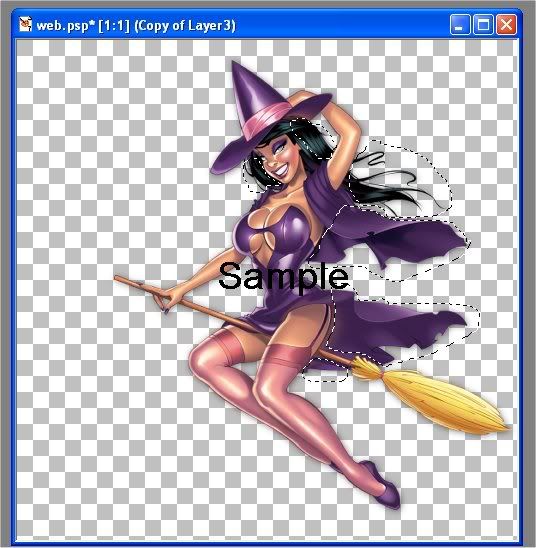
Close tube 1 and 3 and make sure tube 2 is highlighted.
Using your freehand selection tool, hold down the shift key,
and select sections of her hair and her clothing.
Go effects double click ripple and apply following settings.
Click ok and select tube 3 and apply again changing the amplitude to 6 click ok.
Selections select none close all layers except tube 2.
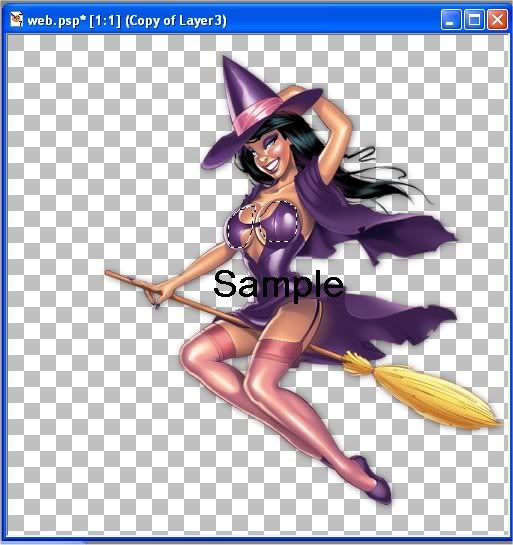
Make sure tube 2 is highlighted,
and again with out freehand tool we select part of her boobs.
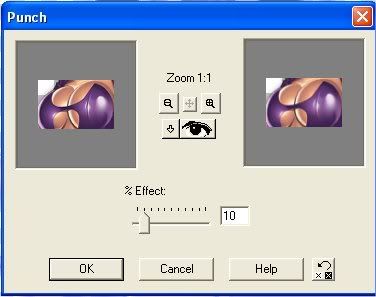
Go effects double click punch and do the following setting.
Close all layers, open tube 1 and open bottom background, select that and merge visible
close it and open tube 2 and background 2 repeat above steps and same again for tube 3.
Apply your copywrite , watermark and name to those 3 layers.
Copy bottom one to animation shop and paste as new animation.
Copy second one to animation shop, right click on frame and paste after current frame,
Copy last one and right click last frame and again paste after current frame.
Edit select all, then animation frame properties and change it to 20, click ok.
View animation and if happy with your result save it as gif.
Hope you Enjoyed this tut, Hana.


FEELING BLUE
My first ever Tutorial, after years of designing, I finally gave into the presure to write up my designs.
 You can find the Tutorial Here

Sunday 24 April 2011
Subscribe to:
Posts (Atom)